![]() One management tool for all smartphones to transfer files between PC & iOS/Android devices.
One management tool for all smartphones to transfer files between PC & iOS/Android devices.
Vivo has launched its X7 and X7 Plus smartphones in its home country. The Vivo X7 and X7 Plus come with a lot of identical features such as unibody metal design and 16-megapixel front camera, which is also highlight of both the devices. The front cameras are also accompanied by an LED flash. The handsets also sport a fingerprint scanner, which is embedded into the physical home button, and 4GB of RAM. Under the hood, both the X7 and X7 Plus are powered by an octa-core Snapdragon 652 (MSM8976) processor clocked at 1.8GHz. and come with 64GB inbuilt storage.

Now you finally made up your mind to purchase this awesome Vivo X7 or X7 Plus. However, have you ever been wondering about how to backup Vivo X7 data such as contacts, videos, pictures, music, etc and how to restore data on Vivo X7? In this article, we will show you how to backup and restore Vivo X7/X7 Plus data by one click.
Vivo X7 |
|
Vivo X7 Plus |
|
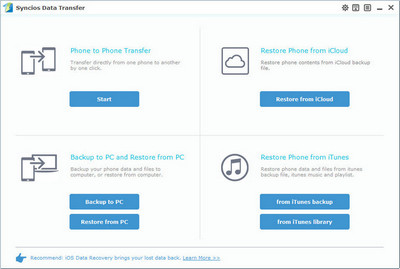
Step 1 . Download and run Syncios Vivo Backup & Restore Program
Download and install Syncios Mobile Backup & Restore Program on your computer first before doing the Vivo X7/X7 Plus backup and restore job.
Open debugging mode, plug your Vivo X7/X7 Plus to the computer and then run Syncios.
Click "Backup" button under "Backup and Restore" modle.


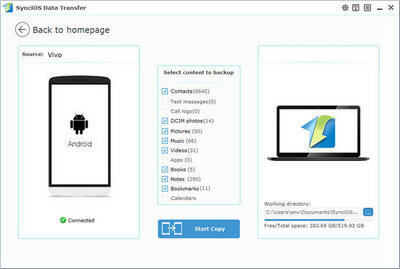
Step 2 . Backup all contents on Vivo X7/X7 Plus
In the main window, you are allowed to select items you would like to back up onto your computer. On the right panel, you will also have the option to change or choose the location of the backup data.
By default, all contents you can backup are ticked. You can also just tick your desired ones.
Then, click "Start Copy" button to backup your Vivo X7/X7 Plus content to computer.
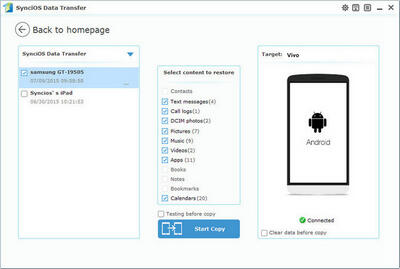
Step 3 . Restore Vivo X7/X7 Plus from backup files
Go to the homepage of Syncios, click "Restore" beneath "Backup and Restore". All backups you have made with Syncios will be displayed on the left panel, just select your previous backup files from it, check data you would like to restore to your Vivo X7/X7 Plus.
Press Start Copy button, all of your selected files will be restored to the target device.
Tips: If your switch to a new phone one day, even an iOS device, Syncios is also capable of restoring your OPPO backup files to it, or directly transferring other phone data to your Vivo X7/X7 Plus. Learn more>>