![]() One management tool for all smartphones to transfer files between PC & iOS/Android devices.
One management tool for all smartphones to transfer files between PC & iOS/Android devices.

The Vivo Nex brings some truly cutting-edge technology to the table but does so with an all-too-common mix of familiar failings. Even though we don't think it's the phone you (or we) really wanted it to be, it's still one of the most exciting phones we've seen in a long time. The Vivo Nex houses a massive 6.59-inch Full HD+ AMOLED panel in a chassis that’s only a smidge larger than the 6-inch Pixel 2 XL. For a phone as big as this it’s surprisingly manageable, with very little bezel around the top three sides and only a small chin below the screen (1.71 mm on the sides, 2.16mm on top and 5mm below the display). The Vivo Nex’s display is every bit as good as you’d want an all-screen phone to be. Not everyone will be happy with the Full HD+ resolution and relatively low pixel density (1,080 x 2,316 pixels and 338ppi), but it’ll serve most consumers perfectly well — with power savings to boot.
In fact, Vivo company has announced two modes of Vivo Nex - Vivo Nex A and Vivo Nex S. Both of which are based on the Apex concept phone and surprisingly enough, do carry most of the innovations on the concept phone to make them truly first-of-their-kind production smartphones. If you need more specifications regarding Vivo nex and want to know the differences between Vivo Nex S and Vivo Nex A, you should go for Vivo official website where you can find the answer.
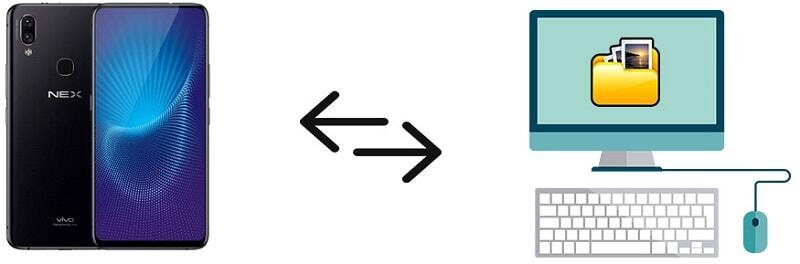
In this article, we are not going to make a review of Vivo Nex phones. Instead, we share some simple ways to transfer photos between Vivo Nex phones and PC since you're sure to take photos with Vivo Nex phones with the high-performance cameras. Now more talking, follow some simple ways listed below to transfer photos between Vivo Nex photos and computer. What's more, transferring photos from another old iOS and Android devices to your new Vivo Nex is also introduced for your sake in this post.
You can use your Google Account or a USB cable to move photos, music, and other files between your computer and phone or tablet. But this post will not attract your attentions if we only offer a way everyone already knew. We all do not want to waste too much time on these little things. Let's check every part one by one. You can jump to the part you prefer.
The job to transfer photos between Vivo photos and computer can be easily done with an USB cable. However, why should us waste time on searching folder by folder to finally move the photos to destination. We highly recommend another simple way by using a free and professional smartphone manager - Syncios Mobile Manager. With the help of Syncios Mobile Manager, you can not only manage, backup, restore, delete phone photos or albums, but also manage other data like contacts, messages, apps, music, videos and more.
Step 1 : Download and install Syncios Manager for free. Then turn on the USB debugging mode on your phone before connecting to computer. Pay attention to the phone screen in case any pop-up message appears.
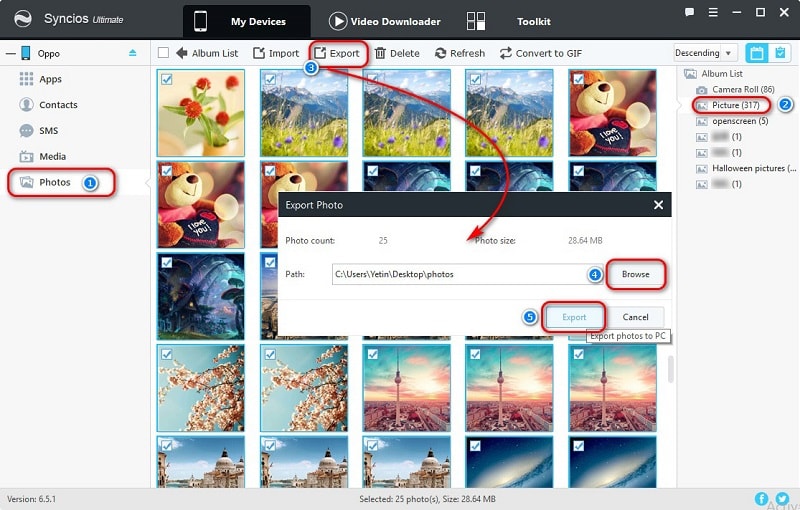
Step 2 : After phone connecting and data loading, navigate to Photos on the left sidebar. Now select photos or a photo album then click on Export. Choose a proper saving location and export them to computer.

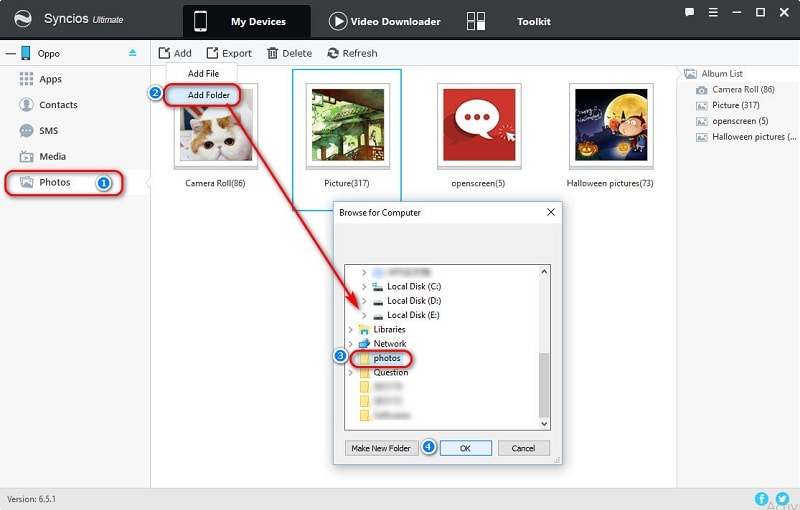
Step 3 : You should have noticed that there is a Import/Add button. Click on it when you need to import photos of photo folders from computer.

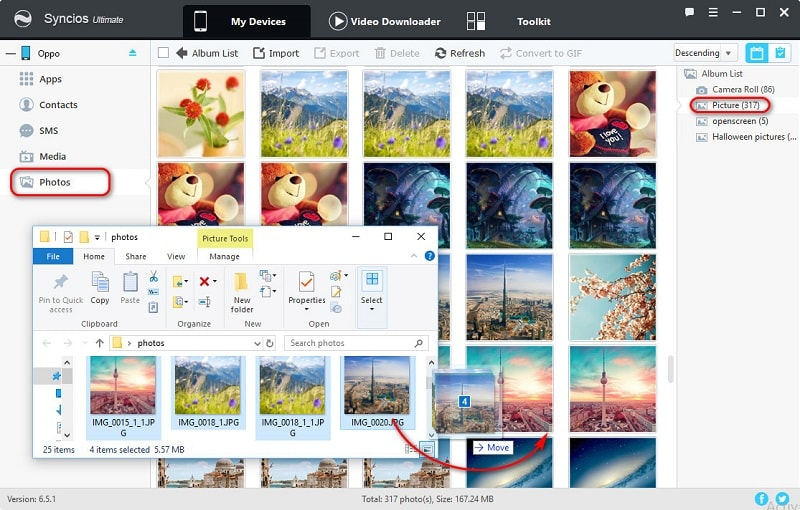
Step 4 : If you don't make things easier, you can just open a photo folder. And then you are allowed to drag and drop photos to Vivo Nex directly.
Tips: Have you learned how to export and import Vivo Nex photos on PC? You can have a try. You can also backup and restore other items in this way. Find Export/Backup to transfer phone data to computer and find Import/Add/Recover button to restore or import data from computer.
We prefer providing solutions which could be easily learned referring to phone data backing up and restoring. If you need a one-click way to backup and restore your Vivo Nex phones, you should find an app called Syncios Data Transfer. It's an all-in-one transfer tool, which means you are allowed to backup and restore phone data, transfer data from phone to phone, retrieve data from iTunes and iCloud backups with the assistance of this tool. Firstly, let's learn how to backup and restore Vivo Nex photos with one click.
Step 1 : As usual, install Syncios Data Transfer on your computer firstly and launch the program properly. And enable the USB debugging mode on your phone before connecting to computer. Keep your Vivo Nex unlocked when connecting in case any pop-up message appears.
Step 2 : After connecting to computer successfully, you'll find four different modes: Phone to Phone Transfer / Backup to PC and Restore from PC / Restore Phone from iTunes / Restore Phone from iCloud. In order to backup and restore phone, of course we should go to Backup to PC and Restore from PC.
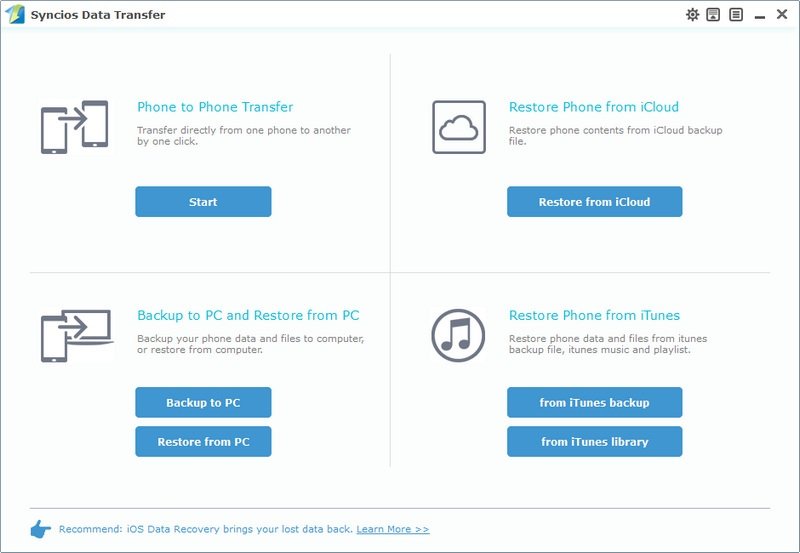
Step 3 : Tap on Backup to PC button to backup Vivo Nex data. Syncios will load your data of Vivo Nex and list them on the middle box. After data loading, tick off DCIM Photos and Pictures. Then tap on Start Copy to transfer Vivo Nex photos and pictures to computer.
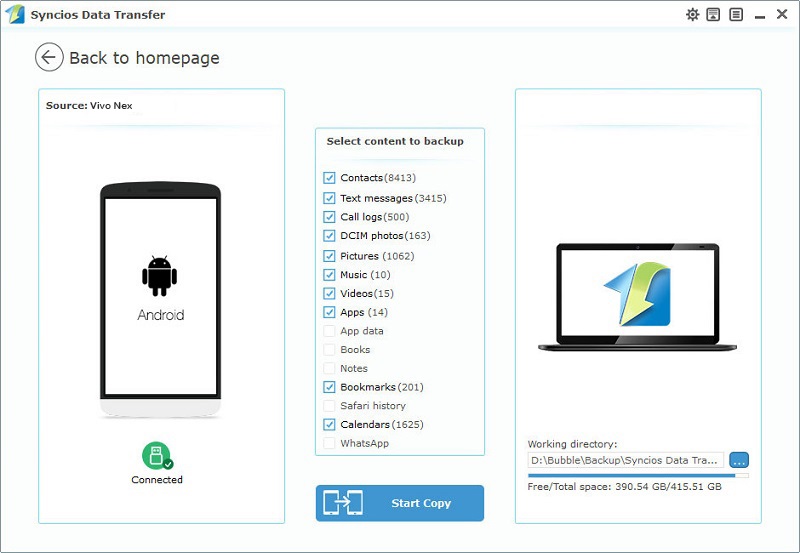
Step 4 : Find Restore from PC When you need to restore backups of photos to Vivo Nex. The backups will be detected automatically. Choose one backup from the left list, then tick off DCIM Photos and Pictures in the middle content box. Finally, click on Start Copy to restore backups to Vivo Nex.

Since Syncios Data Transfer has four modes for data transferring: Phone to Phone Transfer / Backup to PC and Restore from PC / Restore Phone from iTunes / Restore Phone from iCloud. When transferring data from phone to phone, you can also get the job done easily with its help.
Step 1 : Download and install Syncios Data Transfer on your computer. Also, don't forget to check if you've enabled USB debugging mode on the Android device before connecting to computer. Click on Trust on the iOS device when you need.
Step 2 : Tap on the Start button under "Phone to Phone Transfer" in the primary interface. Connect both of your phones to computer via USB cable or WiFi connection. Keep an eye on phones' screen in case any pop-up message. Syncios will load the data of source phone and list them on the middle content box for transferring.
Note: You need to make sure the old iOS or Android device on the left as the source device and the Vivo Nex on the right as the target device when you need transfer data from another device to Vivo Nex. A Flip button can help you to exchange their positions.
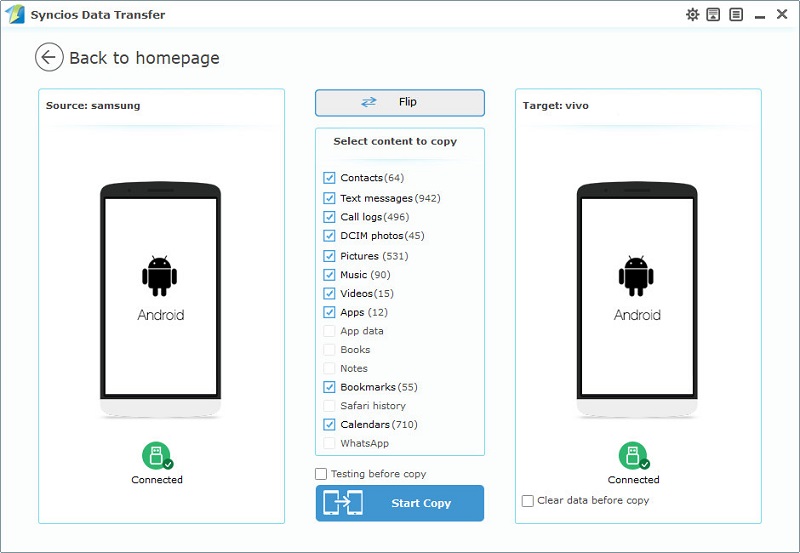
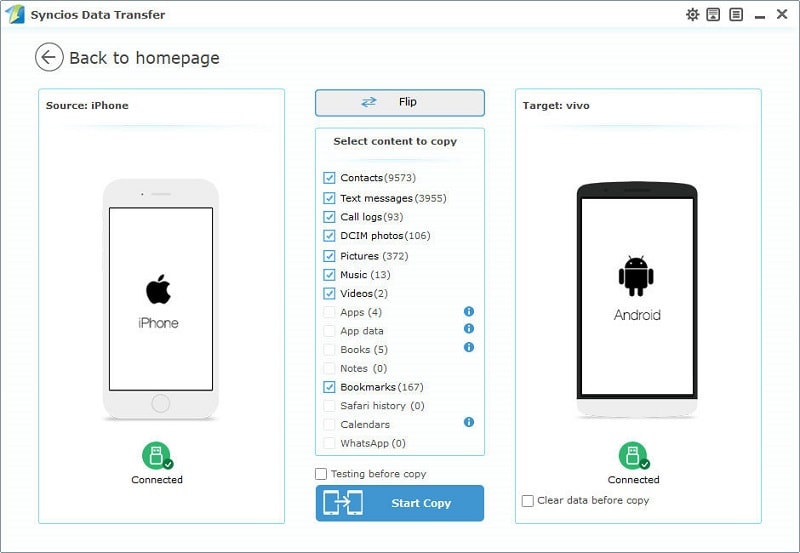
Step 3 : Now what you need to do is select contents you'd like to transfer and click on Start Copy. Wait with patience when data transferring. And keep both device are connected properly when transferring.
Tips: If you would like to erase data on your Vivo Nex, you can check the "Clear data before copy" box before transferring .
Three parts are described with detailed instructions. You may want to have a free try now with Syncios Mobile Manager or Syncios Data Transfer since you've learned three more simple ways to manage Vivo Nex phone data.