![]() One management tool for all smartphones to transfer files between PC & iOS/Android devices.
One management tool for all smartphones to transfer files between PC & iOS/Android devices.
How to Backup iPhone and iPad before Upgrading to iOS 13
Apple has unveiled the next majoy update of iOS version the iOS 13 at WWDC 2019. At the same time of last year, when iOS 12 was released, Apple claims that iOS 12 mainly focused on improvements of performance and stability, and put off many features to iOS 13. It actually made it for some extent. iOS 12 brings noticeable improvements to iOS devices especially some old ones such as iPhone 5s, iPhone 6 and iPhone 6s. So now with the release of iOS 13, Apple bring lots of new features such as the Dark mode, which many iOS users has been long for. Besides, there is no volume popup any more, replaced with a small volume bar. Other features like Siri improvements, Improved Emoji search, Messages improvements are also great. These features are included in the beta version though, it might be a little different when the official version released. iOS 13 no longer supports for iPhone 5s and iPhone 6, if you were still using them, maybe it's the time to change for a newer device.
Currently, Apple only released iOS 13 beta version. As we know that the official version of iOS 13 will be released in Autumn along with the release of new iPhones. So you should be aware that iOS 13 beta version brings massive new features to your device, but it's now only a beta version after all. So you need to keep in mind that the beta version means instability and contains many bugs and issues to be fixed in the future, if you choose to upgrade your iOS device to iOS 13 beta, you will take the risk of losing data due to system failure in some cases. And please take note that due to Apple's security settings, the backup made on higher iOS version is not supported to be restored to the device that running a lower iOS version. For example, if you backed up your device on iOS 13, and downgrade your device to iOS 12, the backup made now can not be restored to your device. So before upgrading your device to iOS 13, we recommend you to backup your device firstly in case of data loss. And this article gives you three methods to backup your device. Let's get started.
Solution 1: Backup iPhone/iPad with iTunes
iTunes allows you to backup as much data as you want only if your drive has enough storage. To backup your iPhone via iTunes, connect your iPhone to it with an USB cable, a message will pop up, asking if you want to Trust This Computer, tap Trust. Then click on the device icon, on the middle of the panel, find Backups option, check This computer, then hit Back Up Now, a full backup of your iPhone will be stored on this computer.
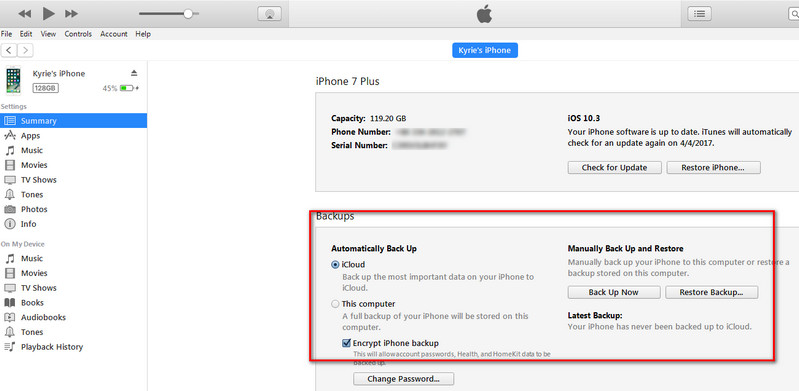
Note: iTunes backs up everything on your iPhone, if you select to encrypt the backups, you are allowed to backup even more data like Health data, your saved passwords, Wi-Fi settings and Website history. But if you choose to encrypt the backup, please do remember the password you set, otherwise you are unable to use the backup file anymore. Moreover, iTunes doesn't allow selectively backup data, it always backs up everything.
Solution 2: Backup iPhone/iPad via iCloud
Every registered iOS user gets 5GB free storage of iCloud. iCloud is very simple and convenient to use to backup your iOS device. You can backup your iPhone anytime you want with a few clicks, you are also able to get your iPhone backed up automatically so that you won't forget to do so. Here is how to backup your iPhone with iCloud.
Make sure your iPhone has been connected to a WiFi network. Then tap Settings > Your name >iCloud, scroll down to find iCloud backup, make sure that iCloud Backup is turned on (If you're using iOS 10.2 or earlier, go to Settings > iCloud > Backup). Tap Back Up Now. Stay connected to your Wi-Fi network until the process completes.
Of course, your iPhone will get backed up automatically only if the device has been connected to a charger, a Wi-Fi network and with screen locked, it's recommended to do this every night so you don't need to bother backing up your device manually.
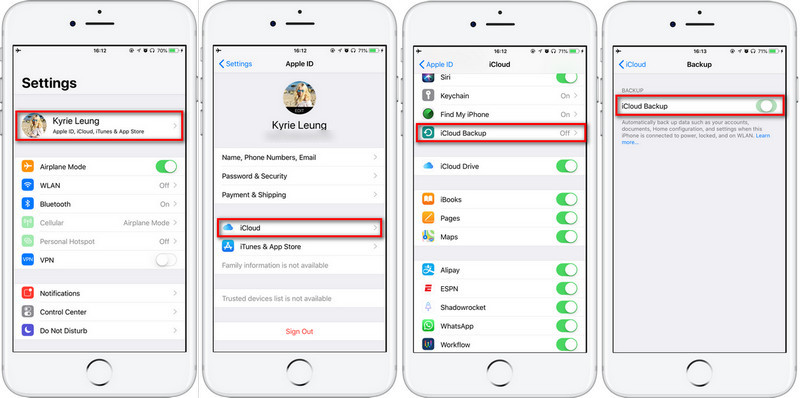
Note: iCloud backs up almost everything on your iPhone with encryption. If you don't want to backup everything, you can customize desired files to backup by toggling on or off which apps you want iCloud to back up.
 Solution 3: 1-click backup iPhone/iPad without using iCloud and iTunes.
iCloud backup requires network, and it's not convenient to restore the backup to your device which needs you to reset your device. So on the third part of this article, I'd like to introduce a professional data transfer tool to you: Syncios Data Transfer, a great handy tool designed to backup your iPhone/iPad with ease. It supports backing up 12 different types of files, including photos, contacts, SMS messages, Notes, Ebooks, call logs, music, videos, etc, and you are allowed to restore the data whenever you want. Unlike iTunes and iCloud, it won't overwrite existing data. What's more, not only does it provide its own backup and recovery service, but it can also restore your iOS device from iTunes/iCloud backups. Check the details below:
Step 1: Download and install Syncios Data Tranfer.
Install the latest version of Syncios Data Transfer program on your computer and then launch it. You will see 3 modes on the main interface: Transfer, Restore and Backup. To backup your iPhone or iPad data to computer, we need to click on the Backup module.
Download
Win Version
Download
Mac Version
Step 2: Connect your device and select data.
Connect your iPhone or iPad to computer with an USB cable, Syncios would detect your iPhone/iPad automatically. After successfully connected your iOS device, simply click on Next button to proceed.
Now you are able to select your desired data on the panel. You can click on "What can I transfer" to check which data are supported to be backed up to PC. Then simply select your desired ones and Select All. Syncios Data Transfer needs some time to load all selected data, it depends on how much data you choose. Please be patient. And after that, similarly, click on Next button to proceed.

Step 3: Start the backup process.
After select all desired data and click on Next, it will start the backup process. After a while, all of the data you selected would be backed up to your computer successfully.
We want to remind you once again, before updating to iOS 13 beta version, it's crucial to made of copy of your data since you are taking the risk of losing all data if it fails. And all three simple methods have been introduced above, you can choose the one which meets your own situation. Of course, if you encountered some other problems while backing up your device to computer, please leave a comment below or contact us, we are very willing to hear from you and will get back to you soon.