Syncios Data Transfer


Transfer Messages, Call logs, Apps, Music, Video to Vivo X200 Ultra
At Mobile World Congress, Chinese handset maker Vivo gave a select group of journalists a sleek peek at its ambitious concept device that went for that all-screen look without settling for a notch to house its front-facing camera. But, it was called a "concept device" for a reason, because the phone isn't ready for mass production -- and may never be, due to the ambitious nature of that pop-up camera. Not even a month later, Vivo has launched in Beijing a new (almost) all-screen phone named the V9 that plays it safer -- by settling for that notch.
When you have it, you may need to transfer data from an old iPhone or Android phone to the new Vivo X200 Ultra. The traditional idea is to connect the phone to the computer with USB cable and store the phone data to the computer. Then connect the new Vivo X200 Ultra to the computer and restore the phone data to it. It is obvious that this method is too complicated. So we can use Syncios Vivo Transfer to get what we want.
Syncios Data Transfer
- Transfer contacts, photos, SMS, music, videos and more between devices.
- Restore iTunes backup and iCloud backup to mobile devices quickly.
- Get music and videos from iTunes Library to phones simply.
- Works perfectly with iOS and Android smartphones and tablets.
 Solution 1: How to Transfer Data to Vivo X200 Ultra by One Click
This traditional method can help you backup your phone data to PC, then restore to Vivo X200 Ultra. However, it needs a few steps and supports limited contents. We recommend you to use Syncios Data Transfer to directly transfer data from old phone to Vivo X200 Ultra. The One-Click Data Transfer tool works for both Android & iOS devices. Follow these quick steps to transfer your data safely and easily, including contacts, messages, call history, photos, videos, songs, bookmarks and so on.
Step 1: Install and Run Vivo Data Transfer
Download and install this handy transfer tool on your PC or Mac according to the computer OS. Connect both your old phone and Vivo X200 Ultra to your computer. Make sure you have enabled USB debugging mode on your Vivo device, Syncios will install an android transfer app on your Vivo phone, check your phone and click "allow".
TIPS: if you have any detection issue, please check our iOS tutorial or Android tutorial to get solutions.
There are 3 modes: Transfer, Backup, Restore. Click Transfer mode.
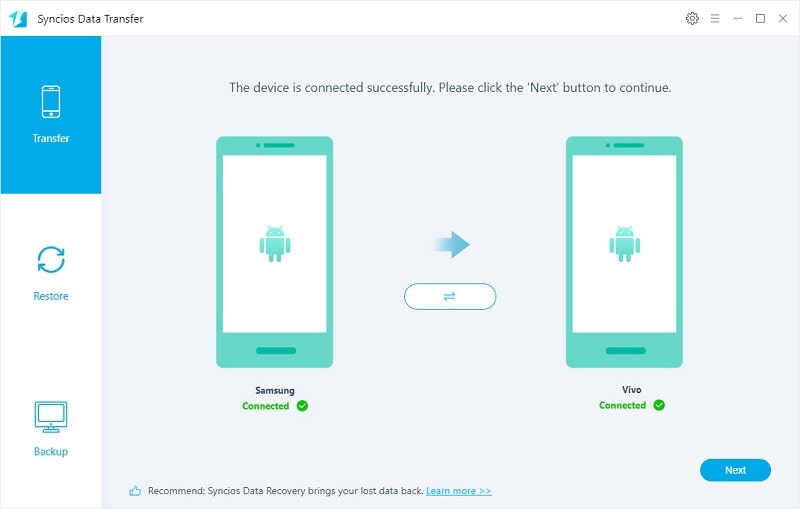
Step 2: Transfer Data to Vivo X200 Ultra
Make sure your source phone is on the left side while Vivo X200 Ultra on the right. If not, click "flip icon" to exchange the source device and target device. It will be just a second before the program finished loading your phone contents.
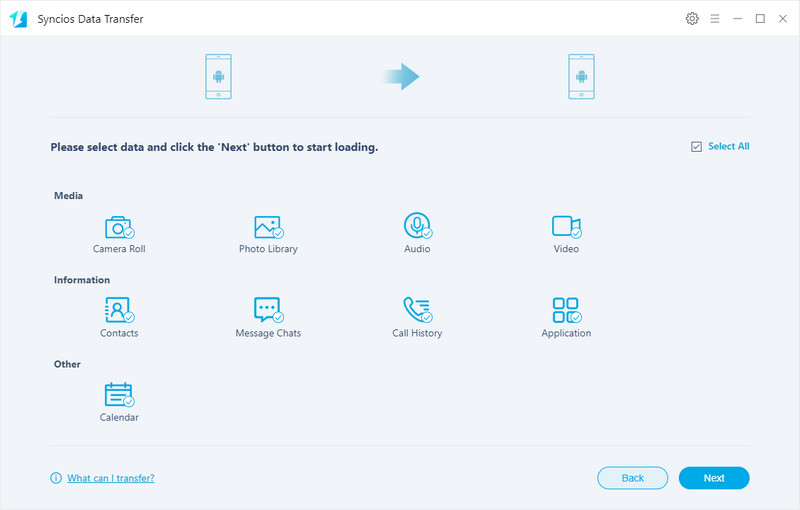
On the middle panel, check data (contacts, text messages, call logs, photos, music, videos, apps, calendars, bookmarks) to transfer from old phone to new Vivo X200 Ultra as your will. Press the blue button "Next" and the details will be shown in the interface. After a while, all of content will be saved on your Vivo X200 Ultra.
TIPS: you can check the supported data from here.
Solution 2: How to Transfer Data from iTunes Backup to Vivo X200 Ultra
Step 1: Download and install Syncios Data Transfer
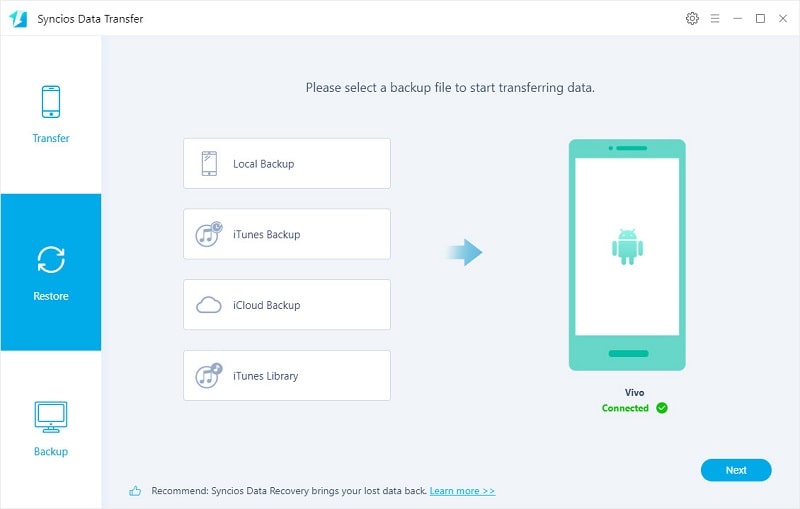
This handy Vivo transfer program also allow you to recover data from iTunes backup to your new Vivo X200 Ultra device. Just download and launch the iTunes-to-Android-Transfer program after installing successfully. Go to "Restore", select from iTunes Backup module among the four modes on the main interface of the program.
Step 2: Restore iTunes backup to Vivo X200 Ultra
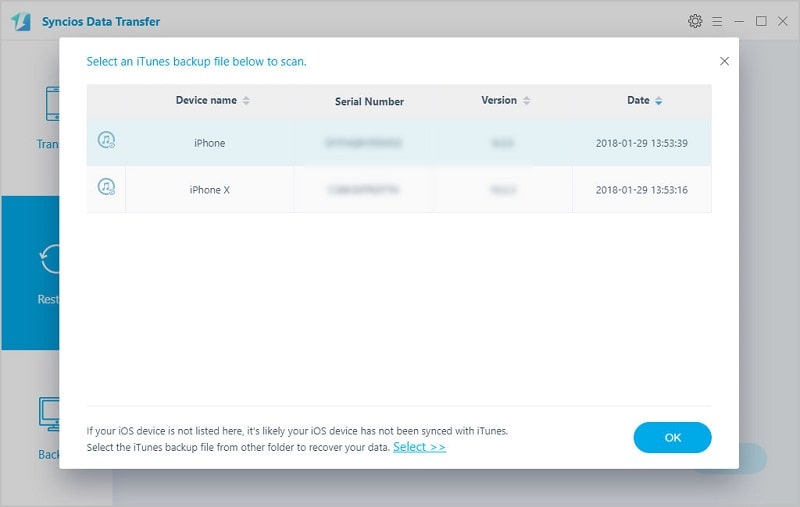
Your iTunes backups will be listed on the left panel, choose one that you want to restore. Then all data from your iTunes backup file will be displayed in categories on the window. Connect Vivo X200 Ultra to Syncios, and make sure your device is well detected by this program.
Then just select the contents you want to restore (including Contacts, SMS, Call logs, DCIM photos, Pictures and Bookmarks) and click the Start Copy button. After a while, the selected data will be restored back to your Vivo X200 Ultra.
Solution 3: How to Transfer Data from iCloud Backup to Vivo X200 Ultra
Step 1: Download and install Syncios Data Transfer
Launch the iCloud-to-Android-Transfer program after installed successfully. You can see four modules on the main interface of the program: Transfer, Restore, Backup. Select Restore module on the homepage and choose "iCloud Backup".
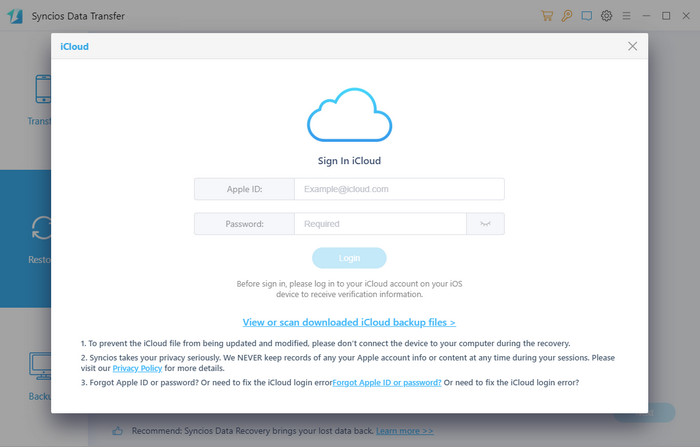
Step 2: Log in your iCloud account and download a backup
Then you need to login your iCloud account. Please make sure to enter the correct Apple ID and passcode. Then Syncios will show a list of your iCloud backup. Just select the proper one for your Vivo X200 Ultra and click Download.
After the downloading process done, please click View or scan the downloaded iCloud backup on the bottom of the downloading window.
Step 3: Select contents to recover to Vivo X200 Ultra
Then all data from your iCloud backup file will be displayed in categories on the window. Connect your Vivo X200 Ultra to Syncios with USB cable, and next time you can also connect your device with WiFi network.
Now you are able to select Contacts, SMS, Call logs, DCIM photos, Pictures and Bookmarks to restore. Clicking on the Start Copy button to transfer selected data back to your Vivo X200 Ultra.
You Can Learn from a Video Tutorial:
Conclusion
This article provides 3 different solutions to transfer files to Vivo X200 Ultra. You can easily choose a solution you need from solutions provided above. If this guide helps, don't forget to share it with your friends.