Syncios D-Savior: SSD Data Recovery Expert

 >
How to >
PC Recovery >
>
How to >
PC Recovery >
Solid State Drive (SSD) Data Recovery (Free or Pro)
When you search for this topic, it means that you have lost important files stored on your SSD, which may be photos, videos, audios, PDF, Excel, Word, PPT, apps, etc. And you definitely don't have a backup to restore. Or other reasons may have caused the SSD data loss. This article lists various difficulties you may face, as well as free and professional SSD data recovery methods. Take action before your data is completely overwritten.
- Part 1: Why You Need to Perform SSD Data Recovery?
- Part 2: How to Maximize SSD Data Recovery Success
- Part 3: Perform Solid State Drive (SSD) Data Recovery Professionally
- Part 4: Perform Solid State Drive (SSD) Data Recovery for Free
- Part 4.1: Perform SSD Data Recovery for Free Using Recuva
- Part 4.2: Common Free SSD Data Recovery Software
- Part 5: Prevention Tips to Avoid SSD Data Loss
- Part 6: FAQs About Solid State Drive (SSD) Data Recovery
What Happened to Your Solid State Drive (SSD)
Solid State Drive (SSD) data loss isn’t magic. It’s usually human error or wear-and-tear. The scenarios listed below may be what you are experiencing, which highlights the necessity of SSD data recovery.
- Deleted files or reformatted the SSD without a backup.
- Got hit by a computer virus or shady software.
- Windows update crashed halfway or installed weirdly.
- SSD partitions loss (like C: drive or D: drive gone missing).
- Unplugging an external SSD during file transfers.
- SSD’s TRIM feature erases deleted files immediately (unlike HDDs).
- SSD drive physical damage.
AnySecura Data Loss Prevention 
Recovering lost files is just the beginning — protect them from leaks, misuse, and unauthorized sharing with AnySecura, the leading enterprise DLP solution for complete data security.
Part 2: How to Maximize SSD Data Recovery Success
Once data is lost, immediately perform the following operations to greatly increase the recovery success rate:
Step 1: Follow Golden 30-minute rule
- Stop writing immediately: Disconnect the SSD from the computer to prevent the operating system from triggering TRIM or overwriting data
- Record the failure phenomenon: Take a screenshot of the error message and mark the lost file type/time
Step 2: Temporarily Disable TRIM (Windows system)
TRIM is the "automatic cleaning" function of SSD, but it will immediately erase the residual traces after data loss. It can be temporarily turned off in an emergency. Temporarily disable the TRIM function through the registry:
- Press Win+R to open the Run box → Enter
cmd→ Press Ctrl+Shift+Enter to open the command prompt as an administrator - Paste and execute the following command (note the spaces when copying):
reg add "HKEY_LOCAL_MACHINE\SYSTEM\CurrentControlSet\Control\FileSystem" /v DisableDeleteNotify /t REG_DWORD /d 1 - After seeing the "Operation completed successfully" prompt, restart the computer to make the settings take effect
⚠️ Note: This operation is for temporary use only. After data recovery, it is recommended to re-enable TRIM (change the last digit to 0 and execute the same command)
Step 3: Emergency SSD Data Recovery
Back up critical SSD data on a functional computer to avoid more data loss.
Step 4: Perform SSD Data Recovery
After completing the above steps, you need to use professional SSD data recovery software to perform a free data scan as soon as possible. Find our lost files and then recover them in time. If you delay too long, the probability of SSD data recovery will be reduced.
Part 3: Perform Solid State Drive (SSD) Data Recovery Professionally
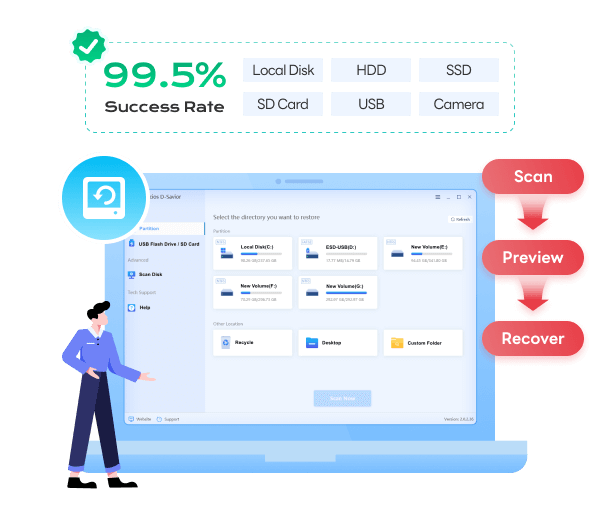
Finding a data recovery tool that can fully scan every corner of Solid State Drive is the key to solving the urgent problem. As the most professional computer data recovery expert, Syncios D-Savior can provide free, fast and deep scanning of SSD, HHD, SD card, USB Drive, and other 2000+ external devices. The scanned data can be viewed according to the original path or file type. And it supports preview before recovery, avoiding waste and energy to recover useless data from SSD. Now let's take the time to learn how to recover photos, videos, audios, documents, compressed files, and more than 1,000 file formats from SSD.
 Syncios D-Savior
- Recover data from a formatted disk, hard drive, lost partitions, emptied recycle bin, etc.
- Recover data from an HDD, SSD, SD/TF card, USB, and 2000+ external devices.
- Recover 1,000+ formats of images, videos, audio, folders, archives, documents, etc.
- Save recovered data to any desired location, including external drives.
- Provide detailed file preview prior to recovery.
- Support recovering data while scanning.
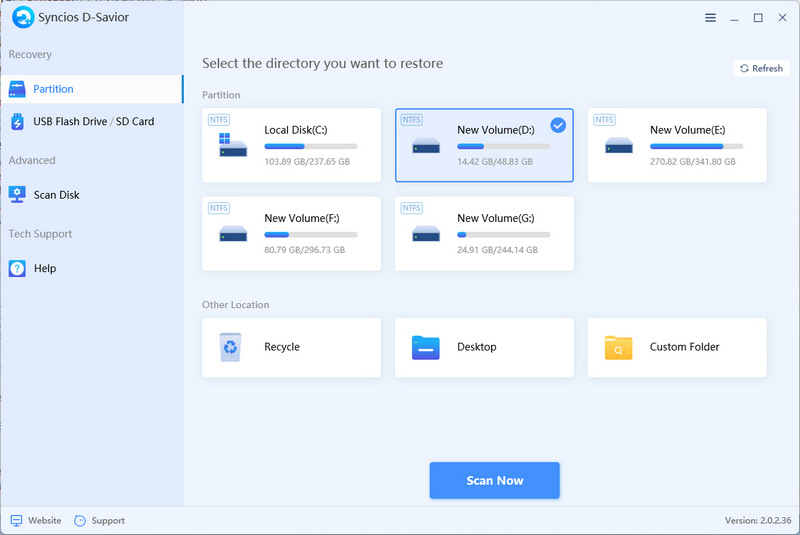
- Step 1: After installing Syncios D-Savior, start this data recovery expert. Syncios D-Savior supports recover data from the local PC or external devices. If you need to recover external SSD, just connect your Solid State Drive (SSD) to your computer. The connected drive will be displayed on the main interface. Choose the Solid State Drive (SSD), judging by the name and type. Once you've spotted it, just scan deleted files on SSD by clicking the "Scan" button.
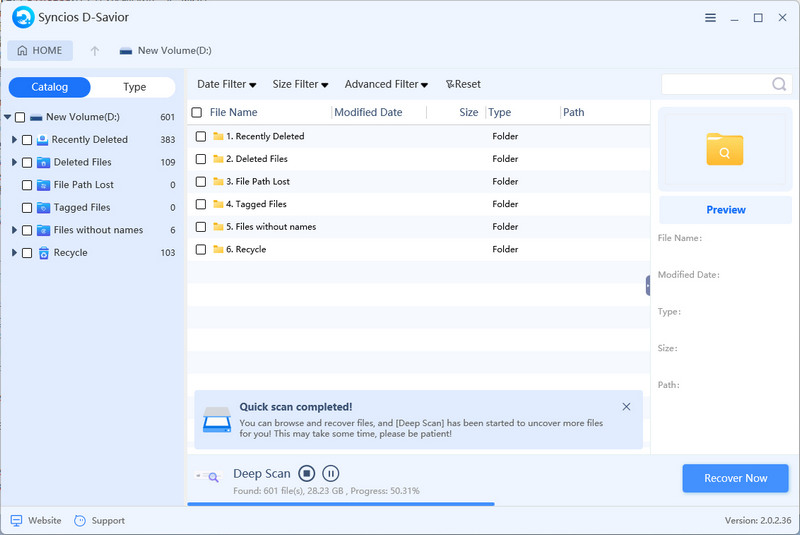
- Step 2: Syncios D-Savior will complete the preliminary scan in a short time. Generally, users can see the lost files they want at this stage. If there are any, you can recover some files without interrupting the deep scan. When the deep scan is completed, every corner of the SSD, even the files in the lost partition or permanently deleted files will be found.
- Step 4: The data in the scanned Solid State Drive (SSD) can be previewed according to the original path of the folder or the type of the file. Just find the required file and click "Preview". If you are sure that this is the lost file you are looking for, click "Recover Now".
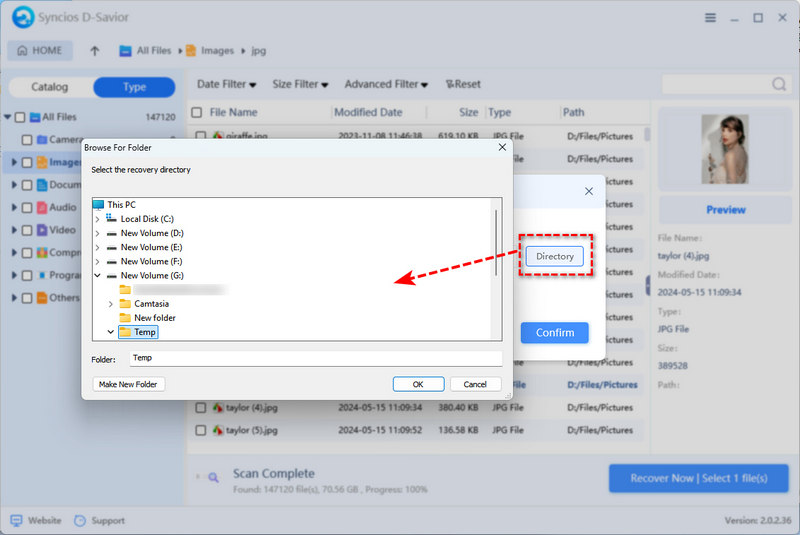
- Step 5: Click "Directory" to confirm which path you need to recover the deleted files on the Solid State Drive (SSD). Click "Confirm" to start recovery.
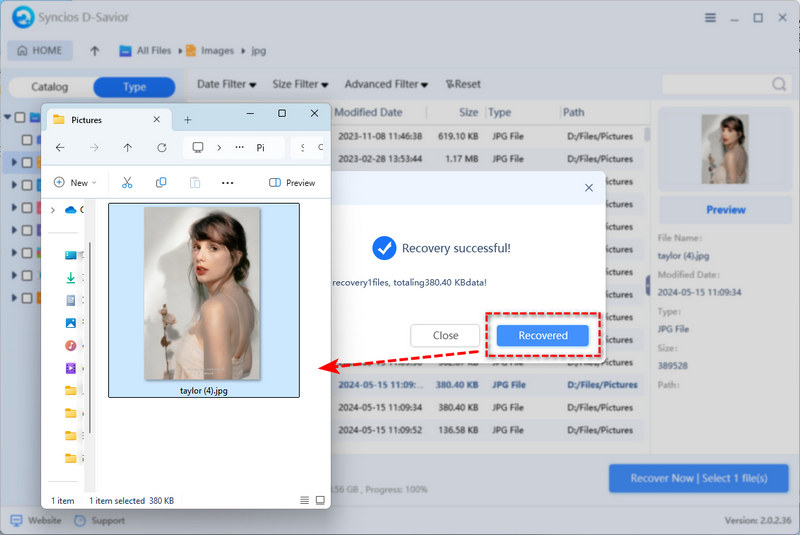
- Step 6: After the recovery is successful, click "Recovered" to navigate to the recovered file. You will find that Syncios also carefully retains the original path of the deleted file for you, so that you can remember how the file was originally saved and reclassify it.

Part 4: Perform Solid State Drive (SSD) Data Recovery for Free
If your Solid State Drive (SSD) files have just been deleted and are not very important, and the data recovery requirements are not high, you can consider some free Solid State Drive (SSD) data recovery software.
Part 4.1: Perform SSD Data Recovery for Free Using Recuva
Recuva is a widely used free data recovery software. However, it does not have a graphical user interface, and its performance is far inferior to that of professional data recovery software for permanently deleted files that require deep scanning. Considering that most users are technical novices, this section provides detailed steps to facilitate everyone who needs to recover SSD or other drives to complete it smoothly.
- Step 1: Head to the Microsoft Store and download the free Recuva software.
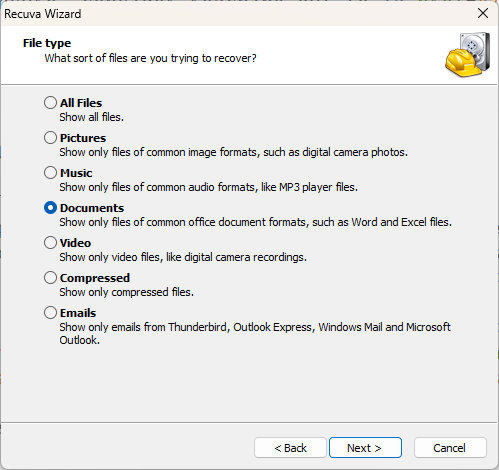
- Step 2: Install the program, then pick your recovery scope. For example, if you only want the deleted Excel files, to save time, focus on "Documents" for Excel files instead of full SSD scans (which take 12+ hours). Click "Next" to proceed.
- Step 3: If you remember where your Excel files were stored, choose "In a specific location" and enter the folder path. For uncertain SSD data loss, select "I'm not sure" – this searches the entire drive.
- Pro Tip: Always scan the whole SSD drive rather than single folders. Deleted files often fragment and hide in unexpected areas, especially after multiple overwrites.
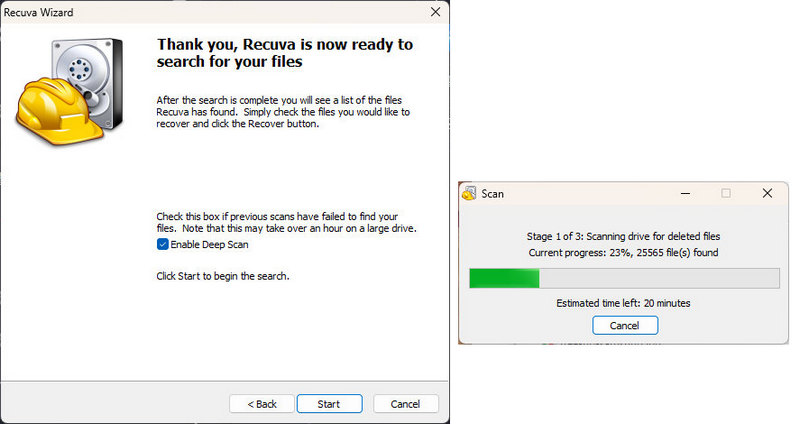
- Step 4: Turn on "Enable Deep Scan" for thorough SSD recovery – crucial for older deletions or corrupted drives. Hit "Start" to begin scanning.
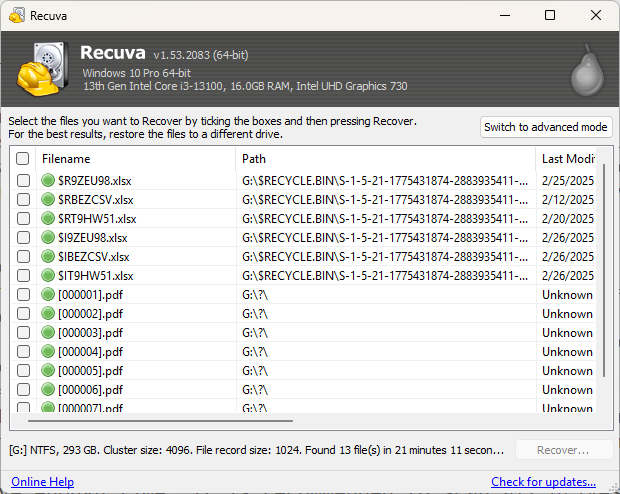
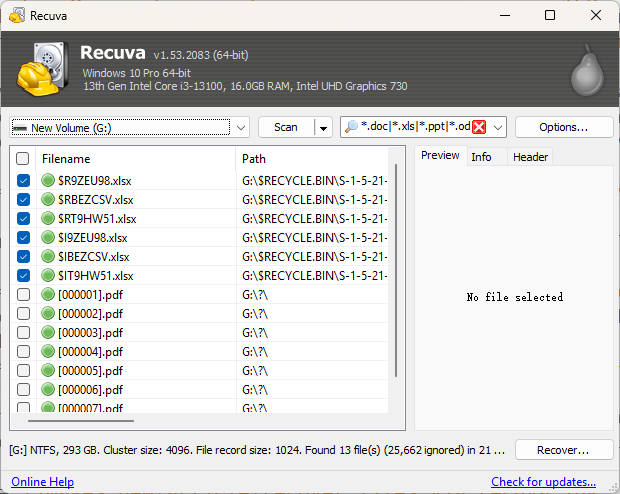
- Step 5: After scanning, click "Switch to advanced mode" (top right). Filter results using ".xlsx" or partial filenames – this helps pinpoint lost Excel files on your SSD.
- Step 6: For nameless files, use modification dates and folder paths as clues. Check recovered file previews before saving – critical for verifying SSD data retrieval success.
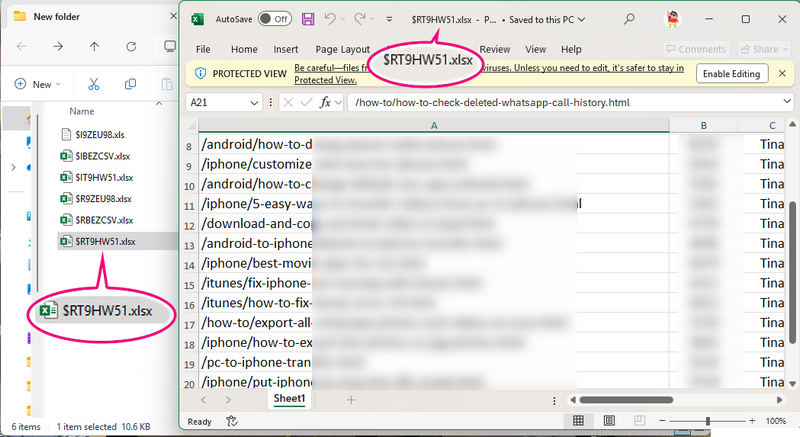
- Step 7: Always save recovered files to a different drive – restoring to the same SSD risks overwriting other deleted data.

Part 4.2: Common Free SSD Data Recovery Software
In addition to the data recovery tools specifically introduced above,The following are some common free data recovery software. After testing, they can recover deleted files to varying degrees. You can choose one for Solid State Drive (SSD) data recovery according to their characteristics.
| Tool Name | Best For | Key Limitations |
|---|---|---|
| Windows File Recovery |
• Recent deletions (within 72 hours) • NTFS/ReFS file systems • Microsoft Office/Photos files |
• No GUI - command-line only • Fails if TRIM completed • No macOS/Linux support |
| Recuva |
• Quick undelete from Recycle Bin • FAT32/exFAT drives • Basic photo recovery |
• Struggles with >4TB drives • Cannot recover overwritten sectors • No RAID support |
| TestDisk |
• Partition recovery • Boot sector repair • Cross-platform (Win/Mac/Linux) |
• No file previews • Requires technical knowledge • Slow on damaged drives |
| PhotoRec |
• Raw file carving • 300+ file formats • Works on corrupted drives |
• Loses filenames/folder structure • False positives common • No selective recovery |
Part 5: Prevention Tips to Avoid SSD Data Loss
- Enable Cloud Sync Services: Upload the imported data from SSD to Cloud Sync Services (such as OneDrive or Google Drive)
- Use System File History: Backup SSD via Windows/macOS System File History
- Make A Regular Backup: Regularly backup manually to external storage devices
- Power Safety: Use laptop on battery during storms and invest in UPS for desktop setups
- Pseudo-deletion method: Set the "SSD retention for 7 days" policy in the Recycle Bin properties to leave a golden rescue period for accidentally deleted files
- Follow the 80% Rule: Delete old downloads when drive hits 75% full.
- Firmware update obsession: Check the manufacturer's official website every quarter. SSD firmware updates often contain unpopular data protection patches
- Disguised mechanical disk: Set the SSD to HDD mode (disable TRIM) in BIOS, sacrificing some performance in exchange for the possibility of accidental deletion recovery.
Tips: The PE write life of SSD is calculated by block. Continuously writing to the same location 100 times may cause it to fail earlier than writing 1,000 times in a scattered manner.
Part 6: FAQs About Solid State Drive (SSD) Data Recovery
What are the odds of recovering SSD data?
If the SSD is not physically damaged and the data is accidentally deleted, the probability of recovery using Syncios D-Savior is as high as 95%. But you'd better recover the data in a short time after deletion. Because all data is slowly overwritten over time.
Can you recover permanently deleted files from SSD?
Of course, professional software like Syncios D-Savior supports the recovery of more than 1,000 types of permanently deleted files from SS, even if the SSD has been formatted.
Can you recover long-deleted files from SSD?
This is within the capabilities of Syncios D-Savior. It can deeply scan every corner of the SSD or HHD, and even find deleted files from the lost partition of the computer.
How to recover files from external SSD?
Syncios D-Savior supports the recovery of 2,000+ types of external devices. Directly connect the SSD to the computer, and you can scan and recover data for free.
The Final Thoughts About Efficient Recovery
This article lists in detail how to recover various types of files in SSD through free or professional tools. For more basic SSD data recovery needs, free tools are sufficient. But if you need to deep scan SSD and recover some "deeply hidden" deleted files, then you still need the help of computer data recovery experts such as Syncios D-Savior. Download it and have a "Free Scan" now!
What's next? Download Syncios D-Savior now!
Ethan Mercer | Senior Writer
Related Articles
Related Solutions
Recover permanently 1000+ types of deleted files from both PC and 2000+ external devices.