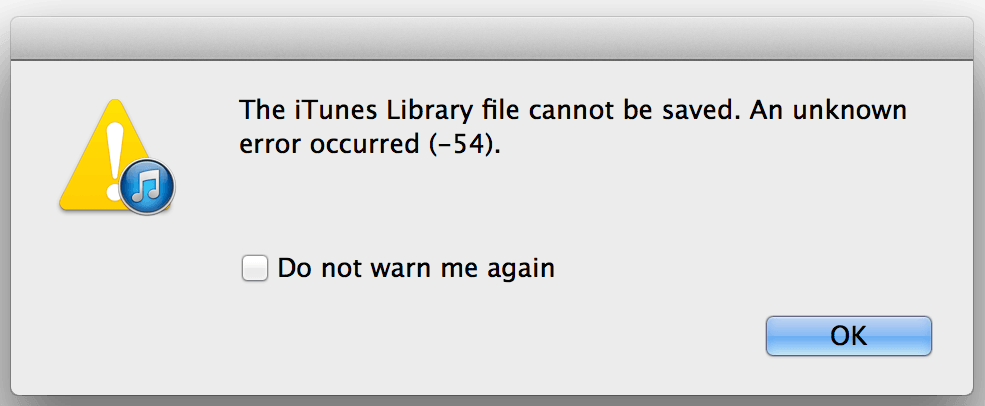
How to Fix iTunes Error -54 ?
"The iPhone [device name] cannot be synced. An unknown error occurred (-54)."
If you are having trouble syncing your iPhone, iPod, or iPad after the Windows 10 update, don't worry. With just a few clicks you will be back up and running, and able to sync your device with your computer again. It appears as though the Windows 10 update is marking the iTunes folder as Read Only, meaning that your computer won't allow it to sync with the device you have plugged in. So, how do you fix this iTunes Error -54? Simple.
 About iTunes Error -54
iTunes sync error- 54 is a permission error either on your computer or device. It usually occurs when you try to sync your iPhone, iPad or iPod using iTunes, after your device has been updated to a new operating system. It appears when you haven’t authorized your computer or don’t have the access/permission to move/modify the data. It can also occur for reasons, stated below.
Solution 1. Restart Computer and Device
Generally, in some case, if you click on "OK" the sync process will continue. But if the operation has been ceased due to the error -54 in iPhone, you can try to restart both your computer and your iOS 13/12/11/10/9/8 device firstly.
Solution 2. Update iTunes and iOS
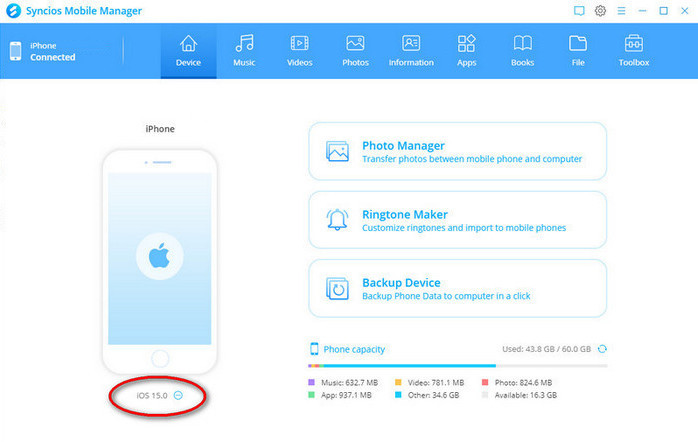
Searching music among hundreds of file folders could be an easy way but still, it's not an effective way. You need some help from a free mobile management tool - Syncios Mobile Manager. It is a professional program which can help you transfer, back up, delete all the music by one-click without any quality loss. Let's have a try.
(1) To update iTunes on windows computer:
Step 1Open iTunes.
Step 2 From the menu bar at the top of the iTunes window, choose Help > Check for Updates.
Step 3Follow the prompts to install the latest version.
Step 4Or you can directly download the latest version from here.
(2) To update iOS on iPhone/iPad/iPod wirelessly:
Step 1Plug your device into power and connect to the Internet with Wi-Fi.
Step 2 Tap Settings > General > Software Update.
Step 3 Tap Download and Install. If a message asks to temporarily remove apps because iOS needs more space for the update, tap Continue or Cancel. Later, iOS will reinstall apps that it removed.
Step 4 To update now, tap Install. Or you can tap Later and choose Install Tonight or Remind Me Later. If you tap Install Tonight, just plug your iOS device into power before you go to sleep. Your device will update automatically overnight.
Step 5If asked, enter your passcode. If you don't know your passcode, learn what to do.
Solution 3. Un-check the "Read-only" Option
If the aforementioned solutions are not working for you to solve the iPhone error, please follow the step-to-step guides to remove your trouble.
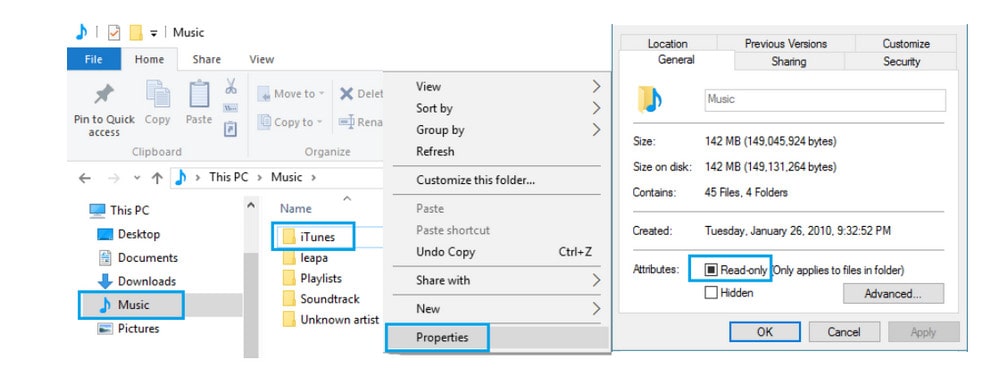
Step 1Open the File Explorer on your computer by clicking on the Windows 10 home button.
Step 2 From the File Explorer side menu Access the Music Folder.
Step 3Expand the Music Folder by clicking on it (You will see the iTunes folder within this folder).
Step 4 Right click on the iTunes Folder.
Step 5 Next, click on Properties and un-check the Read-only option under Attributes.
Step 6 Click on OK to save this setting.
Step 7 Then there will be a pop-up window for you, where you should choose "Apply changes to this folder, subfolder and files" and click on "OK".
Solution 4. Take Full Control of the iTunes Folder.
This should successfully resolve the problem on your computer, allowing you to sync your iOS device to iTunes. In case the issue still continues to bother you, make sure that you have full control on the iTunes folder by following these steps.
Step 1 Right-click on the iTunes Folder
Step 2 Select Properties, click on the Security tab.
Step 3Click on Edit > full control and then click apply.
Step 4Right click on the iTunes Folder.
Step 5You may need to run iTunes in administrative mode in order to take full control of iTunes Folder. Sign in to Windows as an administrator > Right click iTunes icon > Select "Properties" > Select "Compatibility" > Check to run as administrator.
Solution 5. Edit Windows Registry
If you are Windows user, you can edit Windows registry to remove the iTunes sync error 54 by following the guide:
Step 1Click "Start" button > click "Search" > type "command" > pressing ctrl and shift at the same time.
Step 2 Hit "Enter" button > click "Yes" when getting a permission dialog box.
Step 3Type "regedit" when it pops up another window, press "Enter" button.
Step 4Select the Error 54 key after opening the Registry Editor.
Step 5Click "Export" on the "File" Menu, and save the selected key to a folder you like.
Step 6Check if the "Selected branch" is selected in "Export Range" box and then click "Save".
Solution 6. Use iTunes Alternative Tool
iTunes could be kind of irritating while doing iPhone/iPad/iPod data transfer and backing up/ restoring data. Fortunately, there is an third-party tool, like Syncios Mobile Manager , hepling you transfer music, videos, photos, contacts, messages, etc. between iPhone/iPad/iPod and computer easily. With this utility mobile assistant, you are able to backup & restore everything on your iPhone with only one click, manage music, video, playlist, make ringtone.
- Support OS: Mac OS X; Windows
Why do we choose Syncios iTunes Alternative?
- Benefit 1 . Syncios Manager is a powerful iTunes alternative and iOS manager, trusted by millions Apple users. If budget is always your first consideration, why don't you give this a shot?
- Benefit 2 . As an iPhone/iPad/iPod synchronizer, Syncios Manager helps users to transfer more than 12 data between iOS device and computer or Mac efficiently, including : music, video, photo, eBook, contacts, notes , messages, and more. You can do regular backup freely and don't have to worry about data loss.
- Benefit 3 . As a multifunctional iPhone Manager, it allows you to make your own ringtones with several clicks.
- Benefit 4 . Syncios Mobile Manager also comes with some useful toolkit, including One Click backup, One click recovery, HEIC Converter, Photos Compression, which make your digital life more colorful.
Solution 7. Other Fixes Suggested By Apple
If you still see the issue, continue below.
Step 1 Consolidate the media files in your iTunes library
The media files in your iTunes library might be stored in several locations. Try consolidating your files into the iTunes Media folder.
Step 2 Sync a small amount of content.
Sync only a small amount of content at a time. Add more content until you see the error again. By doing this, you'll identify the content that causes the issue.
Step 3 Delete and re-download content.
If the issue happens with content from the iTunes Store, delete and then re-download the content. Or, download the content directly to your iPhone, iPad, or iPod touch.
Step 4Delete and re-import content.
If the content isn't from the iTunes Store, delete and then re-import it from the original source. For example, delete a song and then re-import it from the CD.
Step 5Remove PDF files from the sync process.
This issue might happen when you try to transfer iTunes purchases from your iOS device to your computer. This might also happen when you try to sync with iBooks, because it uses the same process. If so, there might be a problem with a PDF file saved to the iBooks app on your iOS device.
To fix the issue, use the Share option in iBooks on your device to email the PDF to yourself. This saves a copy of the PDF in your email account and shares it with the email address you choose, which can be accessed from your computer. Then, remove the PDF file from your device.
Summary
In this article, we list you 7 useful way to kick off the iTunes Error -54 issue. You can take the one for your real need. And for the synchronization, we highly recommend a Syncios Mobile Manager to preview and sync what you want on your iOS devices. In some degree, you will never have to handle with these annoying iTunes Errors any more.
 Syncios Mobile Manager
Syncios Mobile Manager is an easy-to-use and powerful iOS and Android Mobile manager, which is well-designed for users who want to manage device contents on PC. It allows you to export contacts, photos, music, ringtone, videos, SMS messages, eBooks and more.
- Selectively Backup and Restore Contacts, Message, Call log, Music, Video, Photo, Ebooks, and etc.
- Manage music, edit song details and deduplicate tracks.
- Export SMS, Call History & Contacts to readable format.
- Handy tools: One Click backup, One click recovery, HEIC Converter, Photos Compression, Ringtone Maker, etc.
Extra Tips: How to Recover Any Lost Data to Any Location?

Accidental data loss happens to everyone. If you are bothered by formatted disks, lost partitions, or missing files from USB or SD/SSD/TF card, resort to Syncios D-Savior. This robust program not only can be applied to multiple scenarios, but also supports data recovery from 1,000+ file types including images, videos, audio, archives, and many more. With Syncios D-Savior, you can restore lost data to any location with a few clicks!
Related Articles
Related Solutions
Remove iPhone screen passcode, Apple ID, Face ID, and more in minutes.