How to Use Samsung Galaxy S25/S25+/S25 Ultra
The Samsung Galaxy S25 is a great phone, but one that hasn't really kicked on from the Samsung Galaxy S24, bringing a very similar design and screen to 2017's version. The improved biometrics were sorely needed, and the camera is a leap forward, but the amazing low light capabilities have resulted in sacrifices elsewhere. A top, top phone, but the S9 Plus outshines it.
If you just got a new Samsung Galaxy S25 and have many questions about how to use this new gadget, then please take a few minutes to read this tutorial. We will show you how to use Samsung Galaxy S25 and provide troubleshooting for your check.
Part 1: Insert SIM/Memory Card
Your SIM must be inserted before you can use your mobile phone. And the memory card gives you additional space for saving apps, music, videos clips etc.

Step 1. Find the opener for the card holder.
Step 2. Insert the opener into the small hole in the card holder.
Step 3. Remove the card holder from your mobile phone.
Step 4. Place your SIM as illustrated next to the SIM holder. Place your memory card as illustrated next to the memory card holder.
Please note: your mobile phone only supports nano SIMs.
Step 5. Slide the card holder into your mobile phone.
Part 2: Charge battery
You should charge the phone battery regularly to ensure your mobile phone is always ready for use. Connect the charger to the socket and to a power point. When the batter charging icon is displayed, charging is in progress. When your mobile phone is turned on, you can always see the battery power level. The bigger the coloured section of the battery icon, the more power.
Part 3: Turn Samsung Galaxy S25/S25+/S25 Ultra on and off
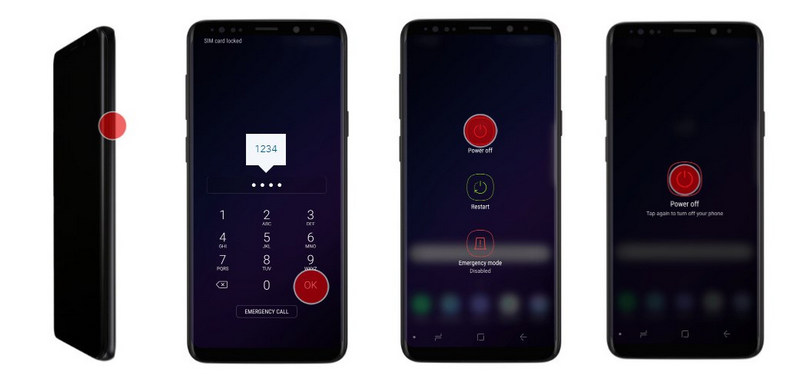
Turn on Samsung Galaxy S25/S25+/S25 Ultra:
(1) Tap and hold On/Off until your mobile phone is turned on.
(2) If you're asked to key in your PIN, do so and tap OK. The default PIN is 1234.
Warning: If an incorrect PIN is entered three times in a row, your SIM will be blocked. To unblock your SIM, you'll need to key in your PUK. The PUK can be obtained by contacting Customer Service. Please note: If an incorrect PUK is entered for ten times in a row, your SIM is blocked permanently. In this case, you'll need a new SIM card.
Turn off Samsung Galaxy S25/S25+/S25 Ultra:
Tap and hold On/Off until s pop-up menu is displayed. Tap Power off. And tap the button again.
Part 4: Activate Google account on mobile phone
A Google account gives you access to several functions on your mobile phone, such as Gmail, Google Play and Google+. Before you can activate a Google account on your mobile phone you need to set up your mobile phone for internet.

Step 1. Slide your finger downwards starting from the top of the screen. Tap Settings icon. Or you can find the Settings app among the app list.
Step 2. Tap Cloud and accounts, choose Accounts.
Step 3. Tap Add account, choose Google. If you don't have a Google account, tap Create account and follow the instructions on the screen to create an account.
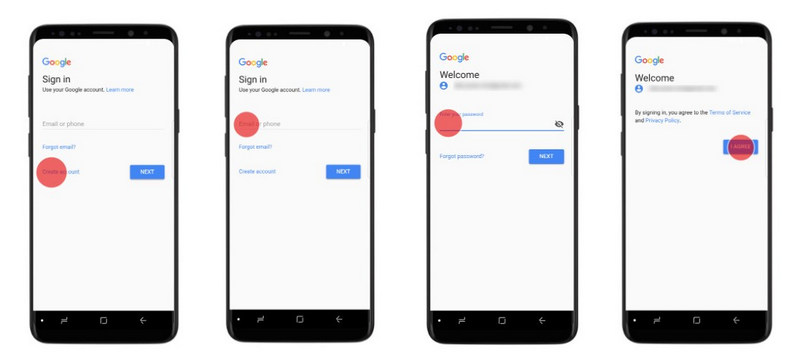
Step 4. Tap Email or phone and key in the username for your Google account. Tap Next.
Step 5. Tap the field below "Enter your password" and key in the password for your Google account. Tap Next.
Step 6. Tap I AGREE and follow the instruction on the screen to select settings for your Google account.
Part 5: Transfer content from another mobile phone to Samsung Galaxy S25/S25+/S25 Ultra
You can transfer content, such as contacts, messages, pictures and audio files from another mobile phone to your S9 when it's activated for the first time and after a factory reset. When this screen is displayed, your mobile phone is ready to transfer contents from another phone.
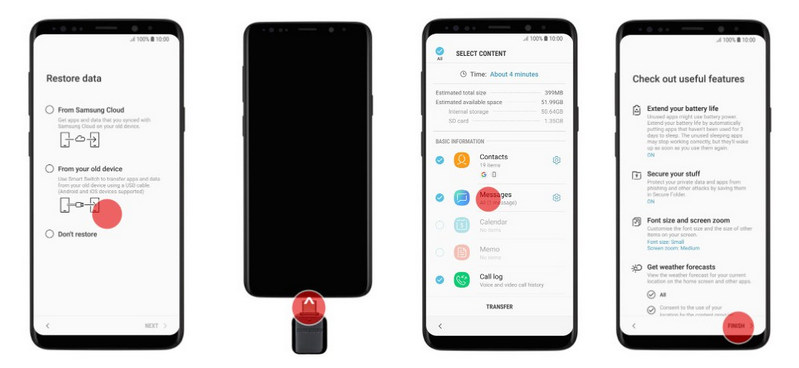
Step 1. Tap From your old device.
Step 2. Connect your mobile phone to another mobile phone via data cable and, if required, the adaptor included.
Step 3. Tap the required data types and tap TRANSFER.
Step 4. Wait until it finished and tap FINISH.
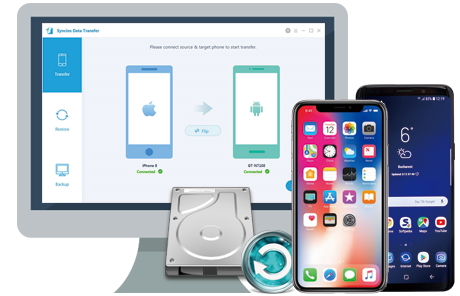
If you are not in factory reset mode or have been used this phone for a while, we recommend you use Samsung Data Transfer to transfer your contacts, messages, calls, photos, music, video and more files from old iPhone or Android phone to new Samsung Galaxy S25 or S9 Plus.
Download
Win Version
Download
Mac Version
Step 1. Download and install this Syncios Samsung Transfer on your computer.
Step 2. Connect both of your old phone and new S9 device to computer. Enable the USB debugging mode on your Samsung Galaxy S25.
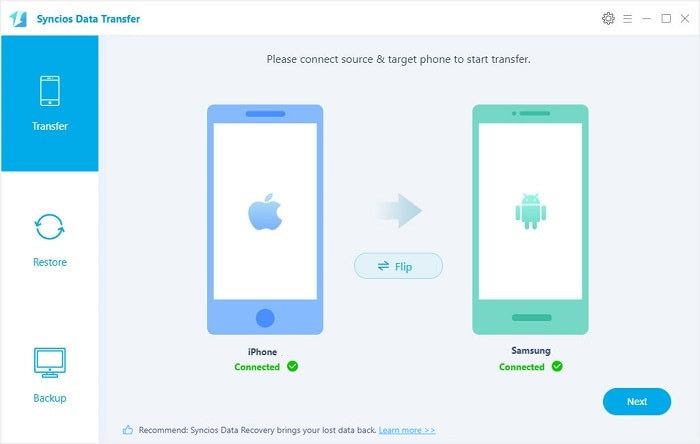
Step 3. Launch Syncios Data Transfer, you can see your two phones under Transfer mode.
TIPS: Any detection issue, please follow this tutorial.
Step 4. Click Next, you can select the data you want to transfer, and tap Next to start copy.
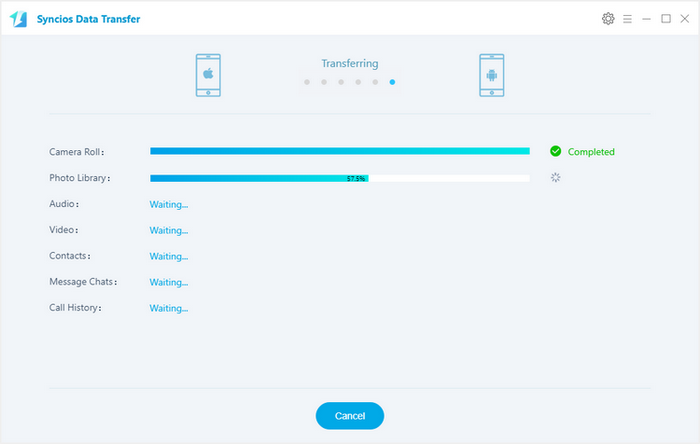
Step 5. Keep both of your phones unlocked and well connected. Wait until it finished.
Part 6: Restore factory default settings
If your mobile phone gets slow or doesn't work as it usually does, it may help to restore the factory default settings. All configurations you've made on your mobile phone are deleted.
Backup your phone data before factory reset:
You should note that factory reset will cause data loss for your Samsung Galaxy S25, so make sure you have backed up your important phone data via Google account, Google Drive and other tools. And you can follow our tutorial to backup your Samsung Galaxy S25.
Factory reset Samsung Galaxy S25/S25+/S25 Ultra:
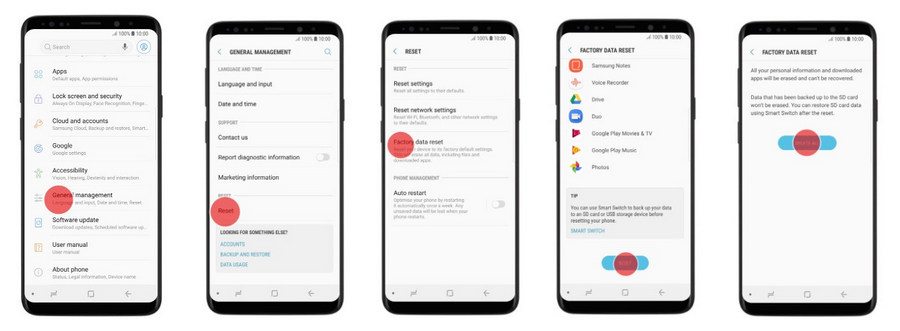
Step 1. Slide your finger downwards starting from the top of the screen. Tap Settings icon. Or you can find the Settings app among the app list.
Step 2. Tap General management. Tap Reset.
Step 3. Tap Factory data reset.
Step 4. Tap DELETE ALL. Wait a moment while the factory default settings are restored. Follow the instructions on the screen to set up your mobile phone and prepare it for use
Step 5. If you have made a backup, restore the backup to your Samsung Galaxy S25.
Part 7: Change ringtone/message tone
Choose ringtone:
You can select the ringtone you want to hear when you get a call.
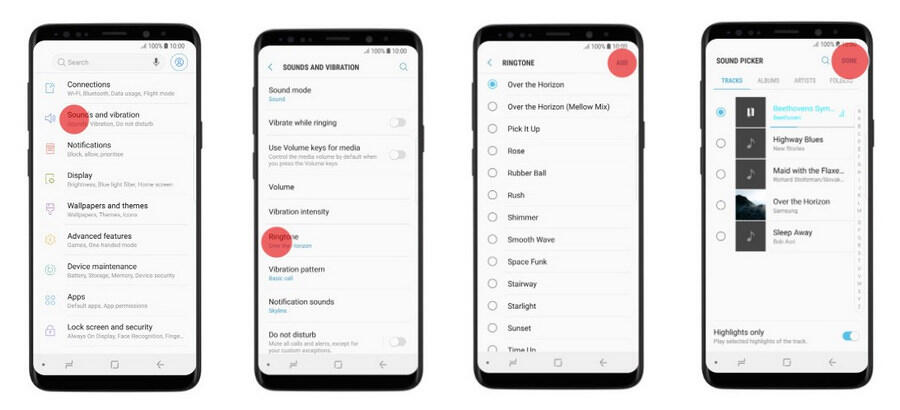
Step 1. Go to Settings. Tap Sound and vibration.
Step 2. Tap Ringtone. Tap Add.
Step 3. Tap the different ringtones to hear from them.
Step 4. Once you've found a ringtone you like, tap DONE.
And if you don't want the system ringtones, you can follow our tutorial to download and make custom ringtone for Samsung Galaxy S25.
Choose message tone:
You can select the message tone you want to hear when you get a message.
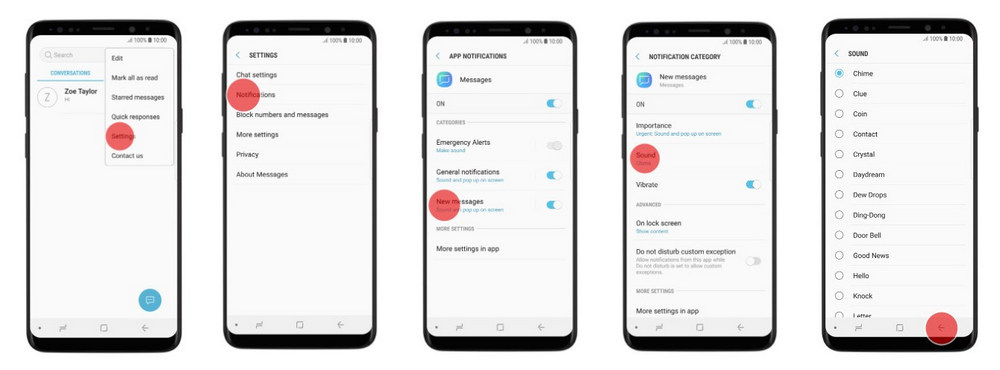
Step 1. Go to Messages. Tap the menu icon, and choose Settings.
Step 2. Tap Notifications, choose New messages.
Step 3. Tap Sound, click the different message tones to hear them, choose the message tone you like.
And if you don't want the system message tones, you can follow our tutorial to download and make custom message tone for Samsung Galaxy S25.
 Troubleshooting for Samsung Galaxy S25/S25+/S25 Ultra
- +1. I can't turn on my mobile phone
-
If you can't turn on your mobile phone, there may be several causes of the problem. We found 3 possible solutions to your problem.
1. The battery is faulty.
If the battery is faulty, you can't turn on your mobile phone. Go to the manufacturer's web page to see if it's possible to change the battery.
2. The battery is flat.
You should charge the phone battery regularly to ensure your mobile phone is always ready for use. Connect the charger to the socket and to a power point. When the batter charging icon is displayed, charging is in progress. When your mobile phone is turned on, you can always see the battery power level. The bigger the coloured section of the battery icon, the more power.
3. Your mobile phone doesn't turn on correctly.
Before you can turn on your mobile phone, you need to insert your SIM into your mobile phone.
(1) Tap and hold On/Off until your mobile phone is turned on.
(2) If you're asked to key in your PIN, do so and tap OK. The default PIN is 1234.
Warning: If an incorrect PIN is entered three times in a row, your SIM will be blocked. To unblock your SIM, you'll need to key in your PUK. The PUK can be obtained by contacting Customer Service. Please note: If an incorrect PUK is entered for ten times in a row, your SIM is blocked permanently. In this case, you'll need a new SIM card.
- +2. My mobile phone doesn't respond
-
If your mobile phone stops responding while you're using it, there may be several causes of the problem.
We found 2 possible solutions to your problem.
1. There's an error in the operating system on your mobile phone. If your mobile phone is slow or freezes, it might help to restart it. Tap and hold On/Off, at the same time, tap and hold the lower part of the Volume key until your mobile phone restarts.
2. The screen lock is turned on. You can lock the phone screen and keys to avoid activating your mobile phone by mistake. Briefly tap On/Off and slide you finger across the screen. Go to Settings, tap Display, tap Screen timeout, tap required setting.
- +3. My mobile phone's memory is full
-
If your mobile phone's memory is full, there may be several possible causes of the problem.
We found 3 possible solutions to your problem.
1. Your apps take up too much memory
You can move your apps to a memory card to free up phone memory. Before you can move apps to the memory card, you need to insert the memory card in your mobile phone. Go to Settings, tap Apps. Tap the required app, tap storage > CHANGE, tap the name of the memory card, then click MOVE.
2. Temporary data takes up too much memory
When you use apps on your mobile phone, various data is stored temporarily in the phone memory. If your mobile phone runs out of memory, it may help deleting this data. Go to Settings > Apps. Tap the required app, tap storage > CLEAR CACHE.
3. Unused apps take up too much memory
You can uninstall apps to free up memory.
Backup your phone data to computer to save space
Actually the best solution could be backup your photos, videos and other files to computer, so you can save a lot of space. Follow our tutorial to backup your Samsung Galaxy S25 to computer.
- +4. No ringtone is heard on incoming calls
-
It's important to find out if you can make a call. If you can't make a call, you need to solve this problem first. When the problem is solved, you will most likely also be able to hear the ringtone. If yes, we found 2 possible solutions to your problem.
1. Silent mode is turned on. When you turn on silent mode, all phone sounds are turned off. Slide your finer downwards starting from the top of the screen. Tap the sound mode icon the necessary number of times to turn silent mode on or off.
2. The ring volume is too low. You can select the ringtone volume when you get a call. Tap the upper or lower part of the Volume key to select the required ring volume.
- +5. I can't send and receive SMS
-
It's important to find out if you can make a call. If you can't make a call, you need to solve this problem first. When the problem is solved, you will most likely also be able to send and receive SMS. If yes, we found 3 possible solutions to your problem.
1. There's an error at the receiving end. If you're having problems sending SMS to a specific number, the error might be at the receiving end. Try sending an SMS to another number.
2. The message centre number is incorrect. An SMS is a text message which can be sent to other mobile phones. Your mobile phone can send and receive SMS as soon as you've inserted your SIM. If this isn't the case, you can set up your mobile phone for SMS manually. Tap Messages, click the menu icon and choose Settings. Tap More settings, choose Text messages. Tap Message Centre. If you're on a pay rate plan, key in +6596197777 and tap SET. If you're on a pay as you go rate plan, key in +6596400001 and tap SET.
3. The SMS isn't written correctly. Tap Messages, click the new message icon. Tap the search field and key in the first letters of the recipient's name. Tap the required contact, and click Start. Tap the text input field and write the text for your SMS. Tap the send icon when you've finished your SMS.
- +6. I can't send and receive MMS
-
It's important to find out if you can make a call. If you can't make a call, you need to solve this problem first. When the problem is solved, you will most likely also be able to send and receive MMS. If yes, we found 5 possible solutions to your problem.
1. Data roaming is turned off. You can limit your data usage when abroad by turning off data roaming. You'll then not be able to access the internet using the mobile network when abroad. You can still use Wi-Fi even though data roaming is turned off.
2. There's an error at the receiving end. If you're having problems sending MMS to a specific number, the error might be at the receiving end.
3. Your mobile phone hasn't been correctly set up for MMS. An MMS is a message which can contain pictures and other media files and can be sent to other mobile phones. You can send and receive MMS as soon as you've inserted your SIM. If this isn't the case, you can set up your mobile phone for MMS manually.
4. The MMS isn't written correctly. Tap Messages, click the new message icon. Tap the search field and key in the first letters of the recipient's name. Tap the required contact, and click Start. Tap the text input field and write the text for your MMS. Tap the attachment icon, click the picture icon and tap the gallery icon and go to the required folder. Choose the required picture and tap DONE. Tap the send icon when you've finished your MMS.
5. Mobile data is turned off. You can limit your data usage by turning off mobile data. You'll then not be able to access the internet using the mobile network. You can still use Wi-Fi even though mobile data is turned off.
- +7. I can't send and receive email
-
It's important to find out if you can use your mobile phone's internet connection. If you can't use your mobile phone's internet connection, you need to solve this problem first. When the problem is solved, you will most likely also be able to send and receive email. If yes, we found 5 possible solutions to your problem.
1. The incoming or outgoing mail server isn't available.
Depending on which mobile network or Wi-Fi network you're connected to, your provider's email servers may be unavailable. Contact your email provider for the correct settings for the incoming or outgoing server.
2. The email isn't written correctly.
Tap Samsung on the app list, find Email. Slide your finger right starting from the left side of the screen, tap the required email account. Tap the new email icon. Tap the field next to "To" and key in the first letters of the recipient's name. Tap the required contact. Tap Subject and key in the required subject. Tap the text input field and write the text for your email. Tap ATTACH > OTHER > My Files and go to the required folder, choose the required file, tap DONE. Tap SEND when you've finished your email.
3. Your mobile phone hasn't been correctly set up for Exchange email.
Go to Settings, tap Cloud and accounts, choose Accounts. Tap Add account, choose Microsoft Exchange ActiveSync. Enter your email address and password, tap SIGN IN.
4. Your mobile phone hasn't been correctly set up for IMAP email.
You can set up your mobile phone to send and receive email from your email accounts. Using IMAP, your emails are kept on the server and are synchronised between all of your devices. It is therefore possible to access your email from different devices. Go to Settings, tap Cloud and accounts, choose Accounts. Tap Add account, choose Email. Enter your email address and password, tap SIGN IN.
5. Your mobile phone hasn't been correctly set up for POP3 email.
You can set up your mobile phone to send and receive email from your email accounts. Using POP3, your email are retrieved and stored locally on your mobile phone and at the same time they're deleted from the server. It is therefore not possible to access your email from different devices. Go to Settings, tap Cloud and accounts, choose Accounts. Tap Add account, choose Email. Enter your email address and password, tap SIGN IN.
 Samsung Data Transfer
Syncios Data Transfer is a professional iOS & Android synchronizing tool, which enables you to backup or transfer messages, contacts, call logs, music, video, audio and other files between iOS & Android devices and computer with only few clicks or directly phone-to-phone transfer.
Backup phone data and restore in lossless quality.
One click phone to phone transfer.
Recover data from iTunes/iCloud backup to iOS/Android devices.
Transfer Music from iTunes Library to devices.
Download
Win Version Download
Mac Version
Related Articles & Tips